Lecture 10
CGI Scripting
The techniques we have learnt in the previous lectures are mostly for client side programming. In other words, the code is executed at the machine the user is running. However, for most Internet applications, significant amounts of processing must be performed on the server side. For instance, to build an online booking system for a hotel, all the enquiries on the availability of hotel rooms have to be transfered to a server where the database of booking information is situated.
Getting a Web server to perform application processing is not necessarily complicated. Most Web servers support the Common Gateway Interface (CGI) protocol, which allows a degree of interaction between the client browser and the server. For instance, our school Web server supports CGI. Therefore we can build a website based on our school Web server. In the last two lectures, we will learn the basic scripting techniques for building a website using CGI.
CGI applications can be written in any language. However, the standard all-purpose languages, such as C, C++, and Java, are mostly too heavy for simple CGI applications. The commonly used languages for CGI applications are scripting languages, such as Unix shell script, Perl, PHP, VBScript and so on. Among them, the most popular languages for small CGI applications are Perl and PHP.
Key words
CGI, Client-side/Server-side Web Programming, Perl, PHP
Reference to textbook chapters
In this unit, we only use Perl. The reason I pick up Perl rather than PHP is that I know Perl more than PHP, although both are good and easy to learn. For basic knowledge on Perl, here is an online book: Simon Cozens, Beginning Perl.
Lab setup
We will not systematically introduce CGI and Perl language. Instead, we learn by practice. To make this possible, we have to set up a server which support CGI. For Windows system, you need to run IIS and install Perl interpreter. For unix system, the school Web server supports CGI and has Perl interpreter installed. Therefore we only have to learn how to use the facility. Let me explain the steps of CGI server setting by using a simple example.
Before we start, you need to download the client side program firstCGITest.html and the server side program myFirstCGI.cgi [Note: If you are not allowed to download .CGI file, try this link]. Store them in a folder on your local machine. Next, we install the server side program to the school Web server via the following steps:
1. Logon to the School unix server through SSH. If you have never used SSH before, please refer to the school Website: https://www.scem.westernsydney.edu.au/home/support/secureshell.
2. Create a folder called Homepage (case sensitive) if it does not exist, and make the folder executable by all by executing (skip this step if the folder already exists):
mkdir Homepage
chmod 755 Homepage
3. Go inside the subfolder Homepage. Create another subfolder cgi-bin and make it executable by all (skip this step if the folder already exists):
cd Homepage
mkdir cgi-bin
chmod 755 cgi-bin
4. You also have to make your home directory executable:
cd
chmod 755 .
Note that there is a dot at the end of the above command.
5. From the SSH main menu, choose window -> New File Transfer. You will see a new window: SSH Secure File Transfer.
6. Choose Operation -> File Transfer Mode -> ASCII from the new window.
7. Go inside the subdirectory cgi-bin under Homepage (on the right column of the window). Upload the file myFirstCGI.cgi.
8. Change the attribute of the file to be everybody can run:
chmod 711 myFirstCGI.cgi
9. Open firstCGITest.html file on your local computer by using a text editor. You will see
<html><head><title>My First CGI</title>
</head><body>
<form action="http://staff.scem.westernsydney.edu.au/cgi-bin/cgiwrap/~jianhua/myFirstCGI.cgi">
<h1>Connect to the server.</h1>
<input type="submit">
</form>
</body>
</html>
Change the URL http://staff.scem.westernsydney.edu.au/cgi-bin/cgiwrap/~jianhua/myFirstCGI.cgi into your login name: http://student.scem.westernsydney.edu.au/cgi-bin/cgiwrap/~XXXXXXX/myFirstCGI.cgi, where XXXXXXX is your school user id.
10. If you are not using the school lab computer, you must connect your computer to the school network using VPN.
11. Run firstCGITest.html by using a Web Browser from your local computer. Click Submit button. If you can see:
Congratulations! You have successfully connected to the server.
then the job is done. Otherwise, check if you have had followed all the above steps. Do these steps again if necessary.
HTML Forms
The most common way for a user to communicate information from a Web browser to the server is through a form. In the above client side program, the form defines an action that calls a CGI program on the Web server:
<form action="http://staff.scem.westernsydney.edu.au/cgi-bin/cgiwrap/~jianhua/myFirstCGI.cgi">
</form>
In fact, it does nothing but specifies the URL of the CGI script myFirstCGI.cgi on the school web server (note that the URL is different from the path of the file). You can actually call this script manually from a web browser using the URL:
http://staff.scem.westernsydney.edu.au/cgi-bin/cgiwrap/~jianhua/myFirstCGI.cgi
A form is defined by the <form> tag. The tag can contain a few attributes, which further specifies the properties of the form. The most frequently used attributes are:
-
•action: specifies the URL where Web application is located.
-
•method: specifies which HTTP method will be used to submit the form data set. Possible (case-insensitive) values are "get" (the default) and "post".
-
•enctype: specifies the content type used to submit the form to the server (when the value of method is "post"). The default value for this attribute is "application/x-www-form-urlencoded". The value "multipart/form-data" should be used in combination with the INPUT element, type="file".
-
•name: specifies the id of the form so that the form may be referred to from style sheets or scripts.
See more attributes of a form from http://www.w3.org/TR/html401/interact/forms.html.
A form can be controlled by a set of widgets, which is used for text, passwords, checkboxes, radio buttons, Submit button and Reset button. A widget is defined by the <input> tag. For instance, the following statement specifies a text input box:
<input type = "text" name = "giveItaName" size = "20"/>
Similarly, the following statement defies a radio button:
<input type="radio" name="sex" value="Male">
You may contain as many widgets as required. In any case, you must define a submit button; otherwise the action specified in the form tag will not be taken and the data collected by the input fields will not be transferred to the server. A submit button can also trigger a call to a local script embedded in the HTML file or an HTA. To learn how to define a form, see another more complicated example moreForms.htm. Note that the action specified in this form is to call the default email program to send the collected information to the specified receiver. For more detailed instructions for building a form, see http://www.w3.org/TR/html401/interact/forms.html.
CGI scripts
The Common Gateway Interface (CGI) is a standard protocol for a Web server to pass a Web user's request to an application program and to receive data back to forward to the user. When a user fills out a form on a Web page and sends it in, it usually needs to be processed by an application program. The Web server typically passes the form information to a small application program that processes the data and may send back a confirmation message. This method or convention for passing data back and forth between the server and the application is called the common gateway interface (CGI). It is part of the Web's Hypertext Transfer Protocol (HTTP). With such an interface, we can write a CGI application in a number of different languages, such as C, C++, Java. However, since most of the CGI applications are quite small, it is more popular to use a scripting language such as unix shell, Perl, PHP, VBScript and etc., to write a CGI application. In this lecture, we use Perl.
The following code is the CGI application (myFirstCGI.cgi) you just put on the school server under your Homepage:
#!/usr/bin/perl
use CGI ':standard';
print "Content-type: text/html\n\n";
print "Congratulations! You have successfully connected to the server.";
The code is written in Perl. The first line of the code simply tells the Web server to call a Perl interpreter to execute this code. The next statement specifies the module we use in CGI, which is the standard module. The next two print statements are the messages that are sent to the client's browser. Therefore it is a way the server communicates with clients. The first print statement is telling the client browser that the coming MIME content is of type text/html. Note that there is a space between Content-type: and text/html\n\n. Note that the browser won't be able to display the output at all without this line.
Interaction between the server and clients
One may wonder how the server side program communicates with clients. To see the secrete inside, let's try the following example:
Server side program myName.cgi: [Note: If you are not allowed to download .CGI file, try this link - a zip file with all .CGI files used in Lectures 10 and 11 as well as relevant pracs].
#!/usr/bin/perl
use CGI ':standard';
my $name = param("myName");
print "Content-type: text/html\n\n";
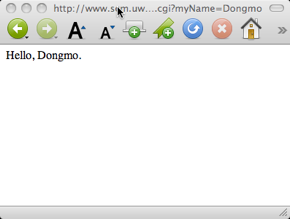
print "Hello, $name.";
Client side program myName.html:
<html><head><title>What's your name</title></head>
<body>
<form action="http://staff.scem.westernsydney.edu.au/cgi-bin/cgiwrap/~jianhua/myName.cgi">
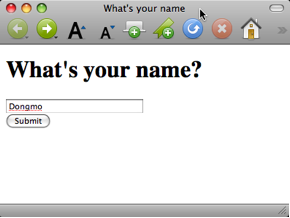
<h1>What's your name?</h1>
<input name = "myName" type = "text" size = "25" /> <br>
<input type="submit" value ="Submit">
</form>
</body>
</html>
Follow the steps we did before to upload the server-side program to the cgi-bin folder under your unix Homepage and run the client side html file. You will see similar results as shown in the figures below. It is easy to see that in order to capture the content of the text field, named myName, in the client side program, call the param function in the server-side program as param("myName"). The function will return the content that has been filled in the text field.
We will show more complicated examples in next lecture.


